In BreakTest, concrete and soils test results are recorded on a long running table list on their e-forms (the list is broken up to fit letter-size pages for reporting). This continuous list simplifies managing the test results.
However, the list can get quite long for field density tests, and there are times when you need to work on certain field density test rows, and skip others. For example, you may need to assign proctors to only a set of applicable rows. Or if you’re approving the test results, you may need to skip certain rows due to inaccurate information. More purposes for this capability follows later in this article.
Two ways to select multiple rows
On the field density form, you can select a set of rows whether or not they are contiguous:
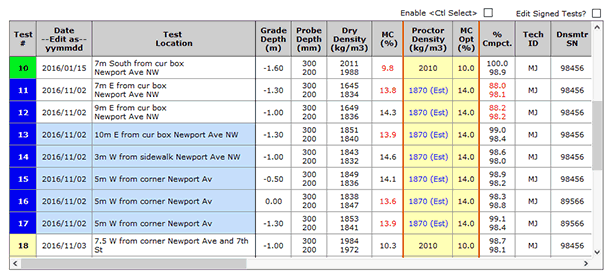
- To select adjacent rows, use the default free selection method (i.e. click-and-drag or Shift+Click).

Rows #13-#17 are touching, and were selected by the click-and-drag method.
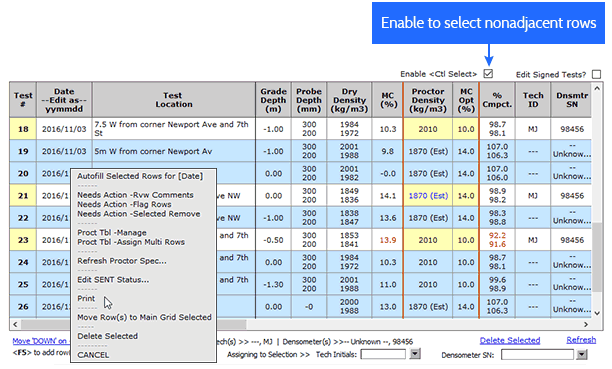
- For nonadjacent rows, tick the Enable
checkbox. Then with the Ctrl key pressed down, you can select multiple non-contiguous rows or separated sets of contiguous rows.

Ctrl+Click enabled in order to select set(s) of rows that are not touching. You can perform most tasks to the selected rows, including items in the context menu and the items below the table labeled Assigning to Selection .
Why select certain rows?
With your choice test rows selected, you can apply to them most of the tasks on the right-click context menu, as well as tasks such as assigning technicians or densometers (see image above). Top time-saving advantages include:
- Approving Test Rows: Some rows may need to be skipped for audit due to inaccurate information. In a single process, you can select and sign only those rows that are ready for approval.
- Assigning Proctors: Test rows with a given proctor may not be contiguous. So you can pick and choose those rows to quickly assign the same proctor to them together.
- Assigning Technicians: You can assign a technician to test rows that may or may not be contiguous.
- Printing Select Test Rows: You can choose any set of rows for printing. BreakTest will print a test report that contains only the selected rows, and if they all were previously approved, it will include the last reviewer’s signature, name, and title.
See more on this feature.


